Learning how to create a channel on Instagram is essential for creators and brands who want a direct way to share updates with followers. Instagram’s broadcast channels let you send messages, polls, and media straight to your audience — without replies or clutter.
How we verified this: We referenced Instagram’s Help Center and publicly available documentation and reputable guides to explain what Instagram currently shows (and doesn’t show). Features can vary by app version and region, so if your menus look different, update the app and check Instagram’s settings/help pages.
In this guide, you’ll learn how to create a channel on Instagram step by step, from accessing the feature to customizing your channel settings. By the end, you’ll be ready to start broadcasting updates, exclusive content, and announcements to your audience.
Quick Summary
– Explain where to find the broadcast channel feature in the Instagram app
– Show how to start a new channel from your Instagram inbox
– Debunk who is eligible to create a channel on Instagram
– Clarify how to customize your channel name and description
– Protect your content by managing who can join or react in your channel
How to Create a Channel on Instagram (60-Second Setup)
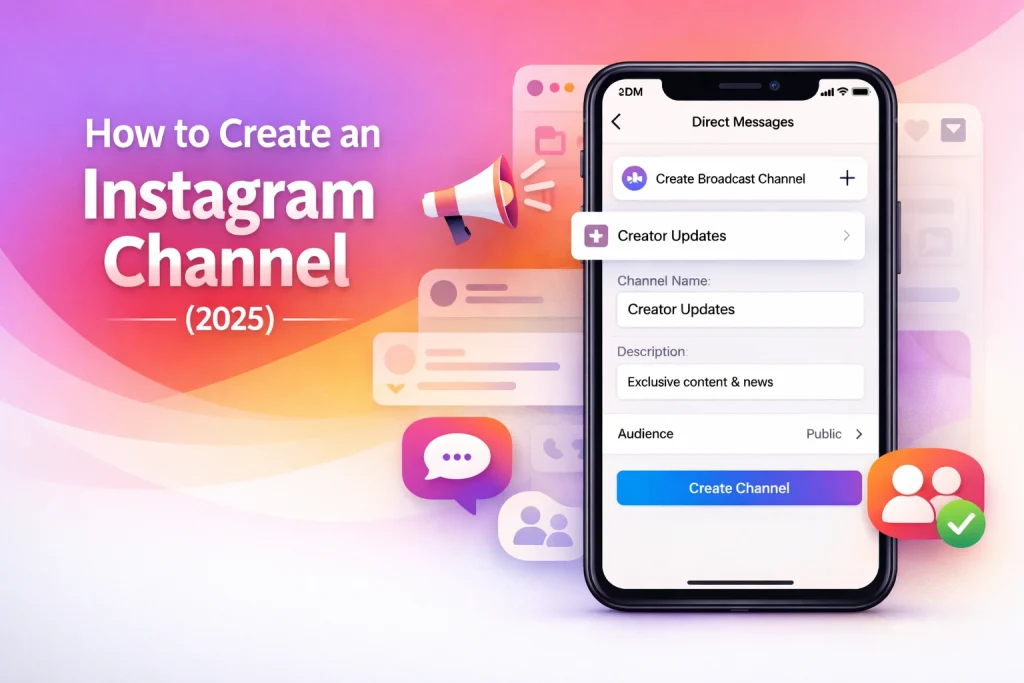
To create a channel on Instagram, open the app, go to your inbox (Direct Messages), tap the “+” icon, select Create broadcast channel, choose a name and audience, then tap Create. The feature is available to eligible public creator accounts.
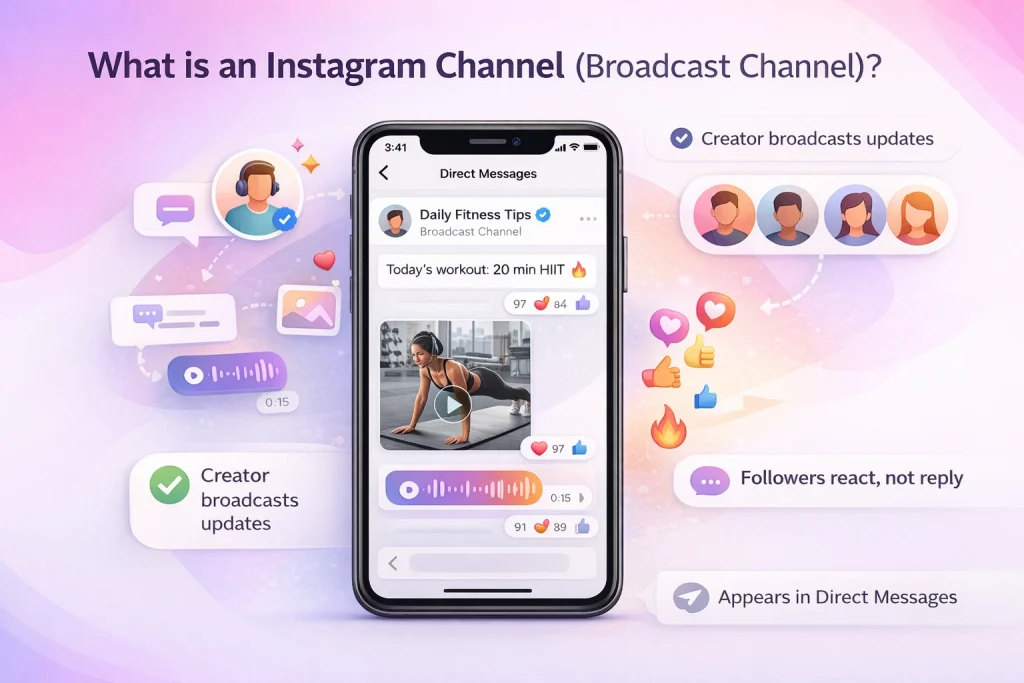
What Is an Instagram Broadcast Channel?
Instagram broadcast channels are a one-to-many messaging feature designed for creators to share updates with their followers. These channels allow creators to send text, images, videos, and voice notes directly to their audience in a streamlined and interactive way. Followers can react to messages but cannot reply, keeping the communication focused and manageable.
Definition and Purpose
Broadcast channels serve as a dedicated space for creators to connect with their most engaged followers. Think of it as a virtual announcement board where creators can share exclusive content, important updates, or behind-the-scenes moments. For example, a fitness coach might use a broadcast channel to share daily workout tips or motivational messages, creating a sense of exclusivity and direct connection.
Benefits of Using Broadcast Channels
One key benefit of broadcast channels is the ability to foster community engagement. By providing followers with unique content, creators can build loyalty and keep their audience interested. Additionally, the one-to-many format is ideal for managing large audiences without the chaos of individual replies. It’s an efficient way to share announcements, promote new projects, or even run limited-time campaigns.
Including visuals, such as screenshots of how broadcast channels appear in the Instagram app, can help users understand their functionality. For instance, the channel appears in followers’ direct messages, making it easy to access and participate.
Who Can Create a Channel on Instagram?
To create a channel on Instagram, users must meet specific eligibility criteria, and access to this feature varies by region. Before you create a broadcast channel on Instagram, make sure you meet all the requirements. This checklist will help you avoid frustration if the feature isn’t showing up for your account.
Requirements checklist (before you start)
1. Have a public Instagram account
Broadcast channels are currently only available for public accounts. If your account is private, the option to create a channel will not appear.
2. Meet the follower threshold
You must have at least 1,000 followers to access the feature. Instagram has stated this is the minimum requirement, and some accounts may still not qualify depending on rollout phase or engagement level.
Note: Verified creators and business accounts may get access earlier. If you’re not seeing the option, consider switching to a creator account, as some features—including broadcast channels—are prioritized for these users.
3. Use the latest version of the Instagram app
Features like broadcast channels are sometimes only available after app updates. Make sure you’re using the most recent version of Instagram from the App Store or Google Play.
4. Use the mobile app (not desktop)
Broadcast channels can only be created and managed through the Instagram mobile app—not via browser or desktop.
5. Look in the right place: your DMs (Inbox)
Even if you’re eligible, you’ll only see the “Create broadcast channel” option in the Instagram Inbox/DM screen. This is where the setup flow begins (not from your profile menu in most cases).
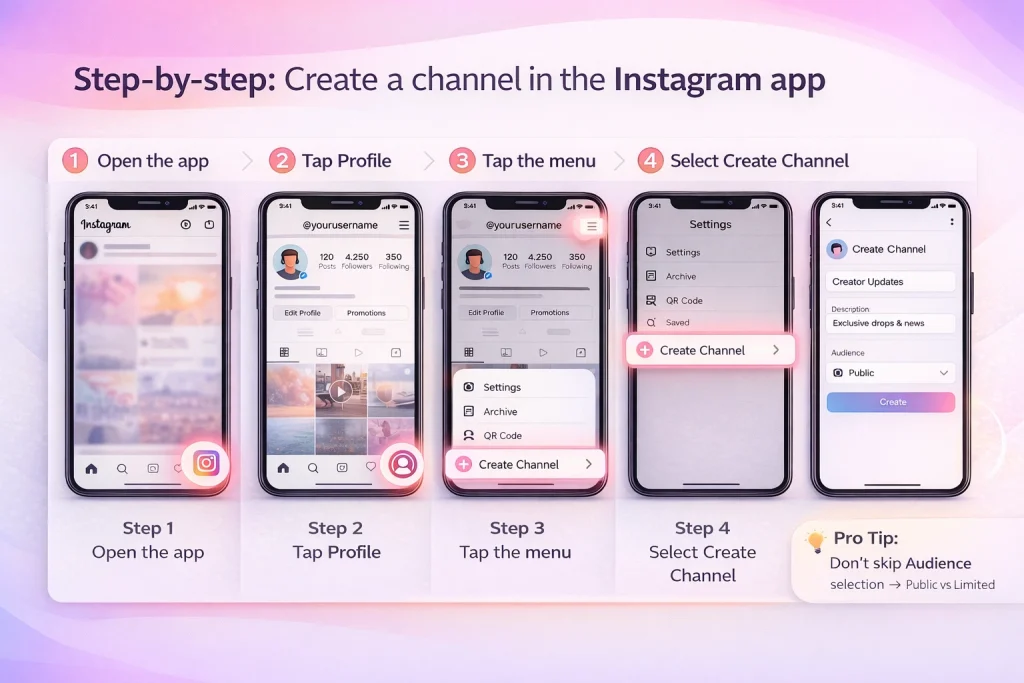
Step-by-Step: How to Create a Channel on Instagram
Creating a channel on Instagram is straightforward once the broadcast channel feature is available on your account. Follow this guide to set up your channel directly within the Instagram app.
Accessing the Feature
1. Open the Instagram app: Start by launching the Instagram app on your smartphone. Make sure you’re logged into the account where you want to create the channel.
2. Navigate to your profile: Tap your profile icon, typically located in the bottom-right corner of the app. This will take you to your personal profile page.
3. Open the menu: In the top-right corner of your profile page, tap the three horizontal lines (often called the hamburger menu). This will open a list of options.
4. Select ‘Create Channel’: From the menu, scroll down and tap the ‘Create Channel’ option. This is where you’ll begin setting up your channel.
Creating Your Channel
1. Name your channel: Instagram will prompt you to enter a name for your channel. Choose something descriptive and relevant to the content you plan to share.
2. Choose your audience: Decide whether your channel will be public or limited to a specific group of followers. You can customize this setting based on your goals.
3. Follow additional prompts: Instagram may ask for further details, such as a description or tags for your channel. Fill these in to make your channel more discoverable.
4. Complete the setup: Once you’ve entered all the required information, tap ‘Create’ to finalize your channel. It will now appear in your profile, ready for you to start posting content.
How Followers Find and Join Your Channel
Once your Instagram broadcast channel is live, followers can join it through multiple entry points. Instagram automatically promotes your channel to your audience using built-in surfaces.
Here’s how they’ll find and join:
1. Join Notification (When Channel is Created)
When you launch your channel, Instagram sends a one-time notification to your followers (or eligible segment). This notification includes a Join button, making it the fastest way for existing followers to opt in.
Note: This works only for followers at the time of creation — new followers won’t get this push.
2. From Your Profile
You can choose to display your broadcast channel on your profile. This adds a button or badge (typically labeled “Join Channel”) directly under your bio.
To enable this:
-
Go to your broadcast channel settings
-
Toggle “Show on profile” ON
This allows profile visitors to join anytime.
3. Via Direct Messages (DM Surface)
If a user receives a message from your channel (like a post or poll), they’ll be able to:
-
Tap the channel title
-
View recent posts
-
Tap “Join” if they aren’t already a member
DM-based visibility keeps engagement high since posts appear in their inbox thread view.
4. Invite Link
Every channel has a unique invite link you can share anywhere:
-
Stories
-
Email newsletters
-
Link in bio
-
External websites
You can find and copy the link from your channel settings. Followers simply tap to join.
Note: You can reset this invite link at any time if it gets misused.
5. Stories with the “Join Channel” Sticker
Use the “Join Channel” sticker in your Instagram Story to promote your broadcast channel. This is a high-visibility CTA that users can tap to join directly.
You can also share a specific message from your channel to Stories, which auto-links to the channel.
6. QR Code (Optional but Available)
Instagram lets you generate a QR code for your broadcast channel, which followers can scan to join.
This is great for:
-
Live events
-
Printed materials
-
Cross-platform promotion
You’ll find the QR option in the Share Channel tools inside your channel settings.
Channel Settings and Controls
Once you start the creation process, Instagram will guide you through setting up your broadcast channel. This setup determines how your channel appears, who can join, and how it functions.
Here’s what you’ll configure step by step:
1. Choose a Channel Name
You’ll be prompted to enter a name for your channel. This is what followers will see in their inbox or when invited.
Tips:
-
Keep it short and descriptive
-
Make it recognizable (especially if you manage multiple channels)
-
You can update the name later from your channel settings
Example: “Behind the Scenes with Sarah” or “Daily AI News”
2. Select Your Audience
Instagram allows you to choose the audience when setting up your channel:
-
All followers – Anyone who follows you can request to join
-
Paid subscribers only – If you offer subscriptions, you can make the channel exclusive to paid members
⚠️ If your account doesn’t offer subscriptions, only the “all followers” option will appear.
You can’t currently target specific groups beyond these two audience types.
3. Show or Hide on Your Profile
You’ll be given the option to show your broadcast channel on your profile. If enabled, a visible “Join Channel” link will appear under your bio for any visitor to see.
Toggle “Show on Profile” ON to maximize visibility.
This is especially useful if:
-
Your join notification has already been sent
-
You want new followers to discover the channel
4. Optional: Set an End Time
Some versions of the creation flow include the ability to set an expiration date for your channel — helpful for event-specific or campaign-based use cases.
If enabled, your channel will automatically close at the scheduled time.
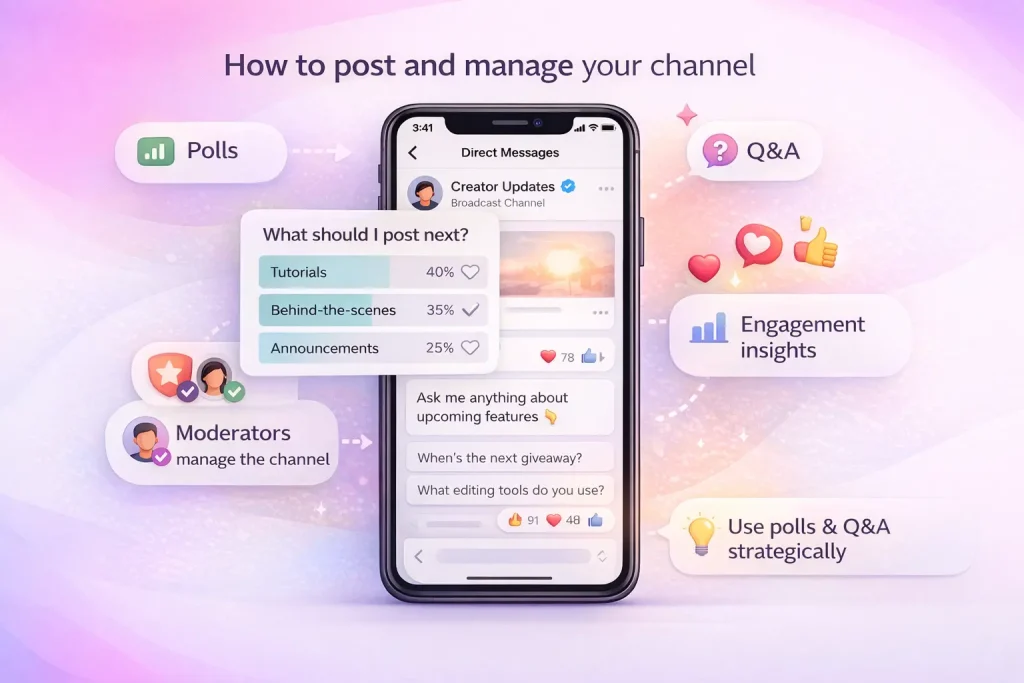
5. Configure Channel Controls (After Creation)
Once your channel is live, go to the Channel Settings to adjust key behaviors:
-
Allow or block replies from members
-
Reset invite link (in case of spam or security concerns)
-
Add moderators to help manage activity and content
-
Enable/disable notifications for members
You can also edit the name, description, or visibility settings at any time.
What You Can Post in a Broadcast Channel
Instagram broadcast channels are designed for one-to-many communication, meaning only the channel creator can post content — and members can only react or view, not reply (unless replies are enabled).
You can share a variety of content formats inside your channel to keep your audience engaged.
1. Text Updates
Post short or long-form messages to share updates, behind-the-scenes notes, tips, or daily thoughts.
Pro Tip: Break long updates into separate posts to avoid overwhelming your audience.
2. Images
Upload photos or graphics to illustrate your message, share memes, highlight a product, or show event visuals.
Great for:
-
Product sneak peeks
-
Visual Q&A answers
-
Branded content drops
3. Videos
Broadcast short videos directly into your channel. These can be vertical or horizontal and follow standard Instagram video format guidelines.
Use videos for:
-
Announcements
-
Mini-tutorials
-
Event recaps
4. Voice Notes (Voice Updates)
You can record and post audio messages, perfect for informal updates, AMAs, or storytelling.
Why it matters:
-
Adds a personal touch
-
Great for creators who want to speak directly to followers
5. Polls
Interactive poll stickers can be inserted into posts to gather feedback or run light engagement campaigns.
Poll examples:
-
“Which product should we launch first?”
-
“Should we go live tonight?”
Members can vote, but not comment.
6. Clickable Links
You can include clickable URLs in your posts, making broadcast channels a powerful tool for driving traffic to:
-
YouTube videos
-
Product pages
-
Newsletters
-
Event signups
Note: This feature is often limited to verified or creator accounts — check if your account type supports it.
7. Q&A Prompts
Use the Question prompt feature to collect questions from followers in advance of live events or themed discussions. These aren’t replies — users submit questions anonymously.
This wide variety of formats makes broadcast channels more flexible than standard Stories or Reels — giving you a controlled, central space to share exclusive content. For creators who focus heavily on content types, managing Reels visibility can also support a more focused channel experience.
How to Promote Your Instagram Channel
After creating your broadcast channel, it’s important to actively promote it. While Instagram automatically sends a one-time join notification to your existing followers, this alone isn’t enough to build long-term engagement or attract new members. Instagram provides several built-in methods to help you share your channel across your profile, content, and beyond.
Display the Channel on Your Instagram Profile
One of the most effective ways to passively promote your channel is by displaying it directly on your profile. If you enable this option, a prominent “Join Channel” button appears below your bio. Anyone who visits your profile — including non-followers — can tap this and request to join, depending on your channel’s audience settings.
To activate this, go to your channel settings and toggle on the option labeled “Show on Profile.” You can disable or re-enable this visibility anytime.
Each broadcast channel has a unique invite link that allows anyone to join with a single tap. You can copy this link from the channel’s settings and paste it into your Instagram bio, direct messages, external websites, email newsletters, or even on other social platforms. This method is particularly useful for reaching audiences beyond your existing Instagram followers.
If the link ever becomes compromised or widely distributed inappropriately, you can reset it from the same settings menu. Doing so will immediately invalidate the old link and generate a new one.
Use Instagram Stories to Promote the Channel
Instagram Stories offer multiple ways to promote your broadcast channel in a more interactive and time-sensitive format. You can add a “Join Channel” sticker directly to a Story, which creates a tappable entry point for viewers. If you’re new to story promotion, this guide on how to add a link to Instagram Stories explains the full process clearly.
You can also share specific posts from your broadcast channel to Stories. When a message is shared this way, anyone who views the Story can tap through to read more or join the channel directly.
Offer a QR Code for Offline or Cross-Platform Promotion
Instagram also provides a QR code that links to your broadcast channel. You can find and generate this code from your channel’s sharing settings. Once created, it can be downloaded and used in various places—flyers, event booths, presentations, product packaging, or anywhere else that supports visual scanning.
This option is particularly useful if you’re promoting your channel to an audience outside of Instagram, or during in-person events where scanning a code is more convenient than tapping a link.
Troubleshooting: Channel Not Showing
Many users find that the broadcast channel feature isn’t visible in their app—even when following official instructions. This typically comes down to eligibility, rollout timing, or app version. If the “Create Broadcast Channel” button doesn’t appear, try the following steps.
Confirm You’re Using a Public Account
Broadcast channels are currently limited to public accounts. If your Instagram account is set to private, the option to create a channel will not show up under any menu.
To switch to a public account, go to:
-
Settings > Privacy > Account Privacy
-
Turn off the “Private Account” toggle
After making this change, fully restart the Instagram app to check if the feature appears.
Check if You Meet the Follower Requirement
Instagram requires most users to have at least 1,000 followers to access the feature. Some larger or verified accounts may get early access, but if you’re under this threshold, you’ll likely need to grow your audience before the option becomes available.
There is no manual way to apply for access—eligibility is determined algorithmically.
Update the Instagram App
Even if your account qualifies, you must be using the latest version of the Instagram app. Feature visibility often depends on version-specific updates.
Go to the App Store or Google Play, search for Instagram, and update to the most current release. After updating, reopen the app and check again.
Look in the Correct Menu Location
Some users mistakenly look for the broadcast channel creation tool in their profile menu. However, the official entry point is located inside your Direct Messages (Inbox).
Here’s how to find it:
-
Open the Instagram app
-
Tap the Messenger/DM icon in the top right corner
-
Tap the “+” icon to start a new message
-
If eligible, you will see the option to “Create Broadcast Channel”
If the option isn’t visible here, it means your account has not yet been granted access—regardless of eligibility.
Regional Rollout May Still Be in Progress
Even if all other requirements are met, Instagram continues to roll out broadcast channels gradually by region. This means the feature may not yet be available in your country or geographic location.
You can’t bypass this limitation, but you can continue to check back periodically. Keeping your app updated and staying engaged with your audience can help signal eligibility when the feature expands further.
FAQ: deleting/ending a channel, notifications, and member limits
Can anyone post in a broadcast channel once it’s created?
No. Only the channel creator can post content in the broadcast channel. Followers can react, vote in polls, and potentially respond if replies are enabled, but they cannot post their own broadcasts.
What happens if someone leaves a broadcast channel?
Users who leave a broadcast channel will no longer receive updates or see the channel inbox thread.
Does Instagram notify me when someone joins or leaves my channel?
Currently Instagram does not send explicit creator notifications for every join or leave. You may be able to see some engagement data in analytics, but individual join/leave alerts are not standard.
Conclusion
Instagram broadcast channels offer creators and brands a direct, focused way to connect with followers. By following the steps and tips in this guide, you’ll be able to set up your channel, manage it effectively, and grow your audience through consistent, high-value updates. If the feature isn’t available to you yet, stay updated and prepare your account so you’re ready when it rolls out.
Choosing the Right Account for Broadcast Channel Success
Creating a successful broadcast channel on Instagram often depends on having an audience-ready account with established visibility and engagement. For many creators or brands, starting fresh can be limiting—especially when follower count and feature access are tied to account maturity. Platforms like InstaDeal, a marketplace for buying and selling Instagram accounts, offer a practical path for those seeking to launch channels with built-in reach. While account ownership comes with added responsibility, starting with the right foundation can streamline setup and improve early channel performance.

Benjamin Amiri
Benjamin Amiri is a digital growth consultant and senior contributor at InstaDeal. He specializes in Instagram engagement strategies, Facebook ads innovation, and TikTok product marketing. With a track record of scaling brands and creator accounts, Benjamin turns performance data into actionable growth tactics that deliver measurable results.