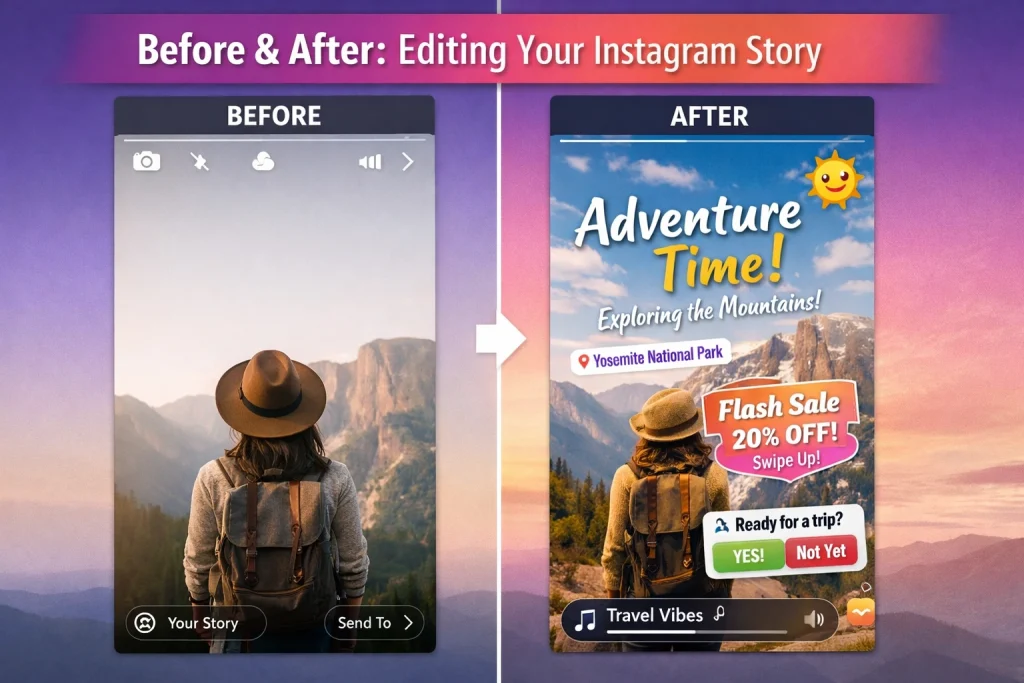
Editing an Instagram Story means customizing a photo or video before sharing it with your followers. Inside Instagram’s Story editor, you can enhance your content by adding text, stickers, music, filters, drawings, and other interactive elements that make the Story more engaging. Instagram provides these creative tools directly in the app, allowing you to capture or upload media and adjust it before it goes live.
If you’ve ever posted a Story and immediately noticed a misplaced caption, a distracting sticker, or music that starts at the wrong moment, you’re not alone. Learning how to edit an Instagram Story before posting helps you catch those small mistakes early so the final Story looks polished and intentional.
What “Edit Instagram Story” Actually Means
When people search for “edit Instagram Story,” they’re usually talking about one of two things: fixing something before the Story is posted or trying to change something after it’s already live. Those two situations work very differently on Instagram, and knowing the difference can save you a lot of frustration.
Editing While Creating a Story (Draft Stage)
The real editing happens while you’re still inside the Story editor, before anything is posted. This is the screen where you prepare your Story—adding elements, adjusting placement, and making sure everything looks right.
Editing After Posting (Limits and Workarounds)
Once your Story is live, you’re no longer in the editor—you’re viewing it the same way your audience does. At this point, Instagram mainly lets you manage the Story, not redesign it.
You can still do a few things, such as:
-
Delete a specific Story frame
-
Adjust privacy or reply settings
-
View replies, reactions, and other interactions
Once the Story is live, the creative elements can’t be changed.
Where Should You Do the Editing?
Another small decision is where to edit your content first. Instagram’s Story tools are great for adding interactive elements, but many people prefer to prepare their photo or video beforehand using their phone’s editor.
A simple workflow that works well for many creators looks like this:
-
Edit the photo or video on your phone (trim, crop, adjust brightness).
-
Upload the finished media to Instagram Stories.
-
Add things like links, mentions, polls, or music inside the Story editor.
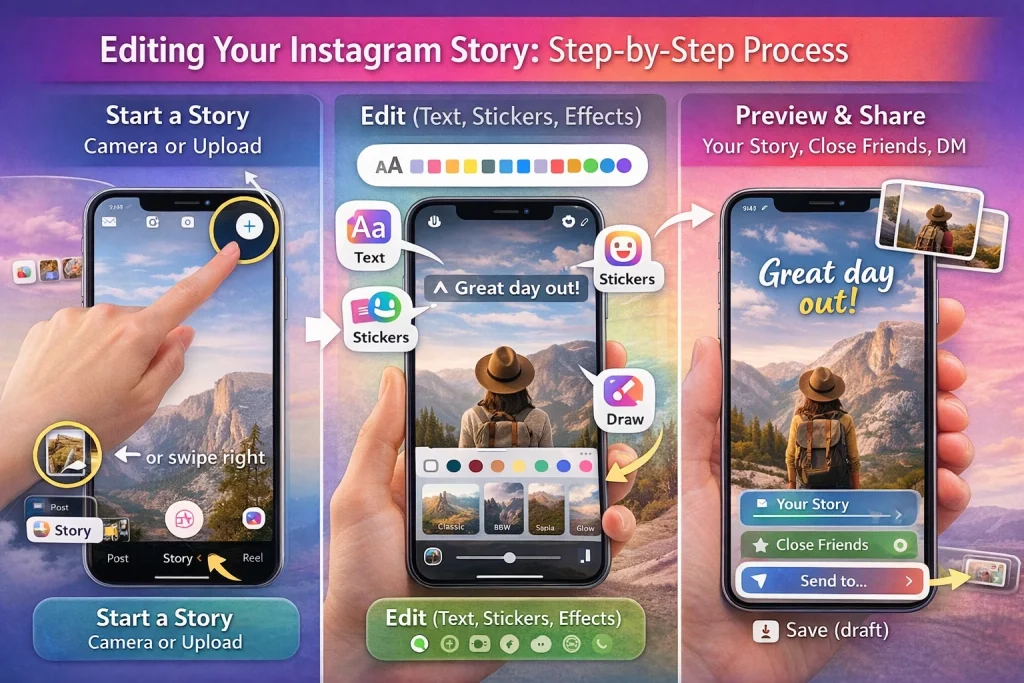
How to Edit an Instagram Story Before Posting (Step-by-Step)
Quick Steps
If you just want the basics, here’s the short version:
-
Open Instagram and swipe right to open the Story camera.
-
Record a photo/video or upload one from your gallery.
-
Tap Aa to add text.
-
Use Stickers to add polls, links, locations, or music.
-
Drag, resize, or rotate elements on the screen.
-
Preview your Story, then tap Your Story to post.
Start a Story: camera, gallery upload, or multi-select
To begin, open Instagram and either tap the “+” (Create) icon or swipe right from your feed. This opens the Story camera.
If you’re uploading something from your phone, tap the small gallery thumbnail in the bottom-left corner. From there, you can choose a photo or video from your device. Many phones also allow multi-select, meaning you can pick several photos or videos at once and each one will become its own Story frame. This is useful when you’re posting a quick sequence or recap.
Preview and share your Story
Before posting, take a moment to flip through your Story frames. This quick preview helps catch small issues like text covering important details, audio starting at the wrong moment, or links that don’t look right.
When everything looks good, choose where to share it:
-
Your Story – visible to your full Story audience
-
Close Friends – shared only with people on that list
-
Send to – delivered directly to specific people or group chats
If you want a backup of the Story before publishing, you can tap the Save or download icon. Some versions of the app also offer a Save draft option if you exit before posting.
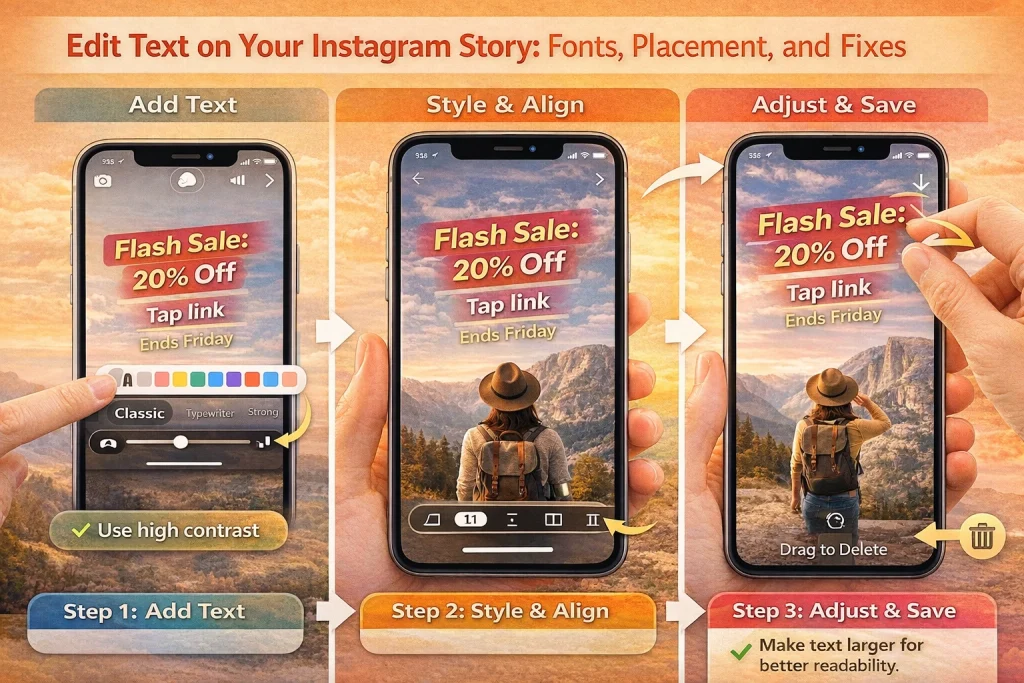
How to Edit Text on an Instagram Story
Adding text: fonts, colors, backgrounds, and alignment
To add text to your Story, tap the “Aa” icon in the editor and start typing. Once your text is on the screen, you can experiment with different fonts, colors, and alignment options until it looks the way you want.
If your text blends into the background, look for the background or highlight option for the font. Adding a subtle background behind the words can instantly make them easier to read, especially on photos or moving video.
Here’s a simple structure that works well for many Stories:
-
Headline: “Flash Sale: 20% Off”
-
Call to action: “Tap link”
-
Extra detail: “Ends Friday”
Adjusting text placement
Before posting, you can keep adjusting the text as much as you like. Tap the text again to edit it or move it around the screen.
A few quick gestures make this easy:
-
Pinch with two fingers to resize the text
-
Drag it to a new position
-
Rotate with two fingers to tilt the text slightly
-
Drag it toward the trash area if you want to remove it
Instagram doesn’t have a layer panel like a full design app, so if text ends up covering something important—like a poll or link sticker—you’ll usually just reposition the elements until everything is easy to see and tap.
Making text easy to read (especially on small screens)
Most people watch Stories on their phones, so readability matters. Aim for strong contrast, like light text on a darker background or the opposite.
It also helps to keep important text away from the very top and bottom of the screen, where Instagram’s interface elements can sometimes overlap.
If your background is busy or colorful, adding a solid or semi-transparent background behind the text can make it much clearer.
For accessibility, keep your message short and avoid very small fonts. And if your Story includes spoken audio, adding quick captions or a short summary on screen helps people follow along—even if they’re watching without sound.
How to Add or Edit Stickers and Links on an Instagram Story
Adding and adjusting stickers
To add a sticker to your Story, tap the sticker icon in the editor to open the sticker tray. From there, choose the sticker you want and place it anywhere on the screen.
Once it’s on your Story, you can adjust it using simple gestures:
-
Drag the sticker to move it
-
Pinch to make it larger or smaller
-
Rotate with two fingers to tilt it
-
Drag it to the trash area if you want to remove it
If you need more detail on how links work in Stories, this guide on adding a link to an Instagram Story explains the steps and limitations in more depth.
Using interactive stickers (Polls, Questions, Quizzes, Emoji sliders)
Interactive stickers like Poll, Questions, Quiz, and the Emoji slider are designed to encourage people to interact with your Story. For them to work well, viewers need to be able to read and tap them easily.
Adding a link sticker
To include a link in your Story, open the sticker tray and choose the Link sticker. Paste or type the URL you want to share, and if your app version allows it, you can also customize the label that appears on the sticker.
When placing the link sticker, think about where people naturally tap with their thumbs. The middle to lower part of the screen usually works best. Try not to layer other elements on top of it so the link stays clearly visible and easy to tap.
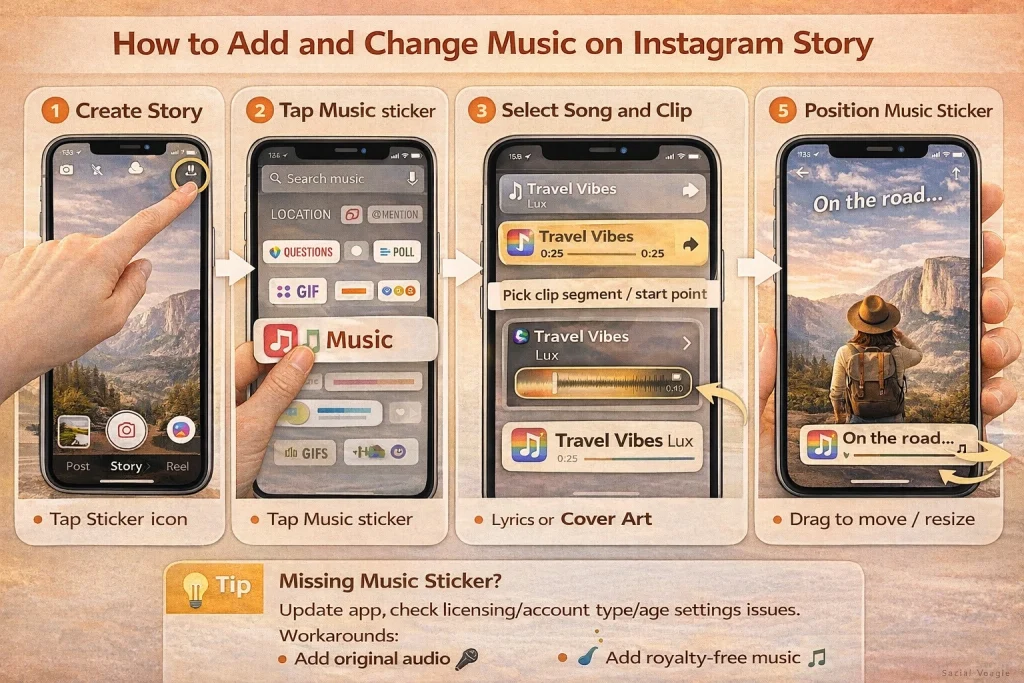
How to Add or Change Music on an Instagram Story
Adding music with the Music sticker
If you want to add music to your Story, Instagram makes it pretty simple with the Music sticker.
Here’s how it works:
-
Create your Story with a photo or video.
-
Tap the sticker icon in the editor.
-
Select Music from the sticker list.
-
Search for a song or browse the suggestions.
-
Tap the track you want to use.
-
Choose the part of the song you want to play.
-
Pick a display style if available (for example, lyrics or album artwork).
-
Move and resize the music sticker so it doesn’t cover important parts of your Story.
Changing the song or adjusting the clip
Before you post your Story, you can usually tap the music sticker to adjust things like the song segment or the display style. This lets you fine-tune the timing without starting over.
Many people assume they need to recreate the entire Story just to change the music, but that’s not usually necessary.
If the sticker doesn’t open the editing options—or it starts behaving strangely—the easiest fix is to delete the music sticker and add it again. Re-select the track and choose the correct part of the song. In practice, this is often faster than trying to troubleshoot the sticker itself.
What to do if the music sticker is missing
If the Music sticker is missing or the song library seems limited, it’s usually due to licensing, account settings, app version, or a temporary glitch.
If that happens, a few alternatives still work:
-
Use the original audio from your video, like voice or ambient sound.
-
Add royalty-free music in a video editing app before uploading the clip to Instagram.
-
Only switch account types if it genuinely fits your needs—changing it just to access music isn’t always necessary.
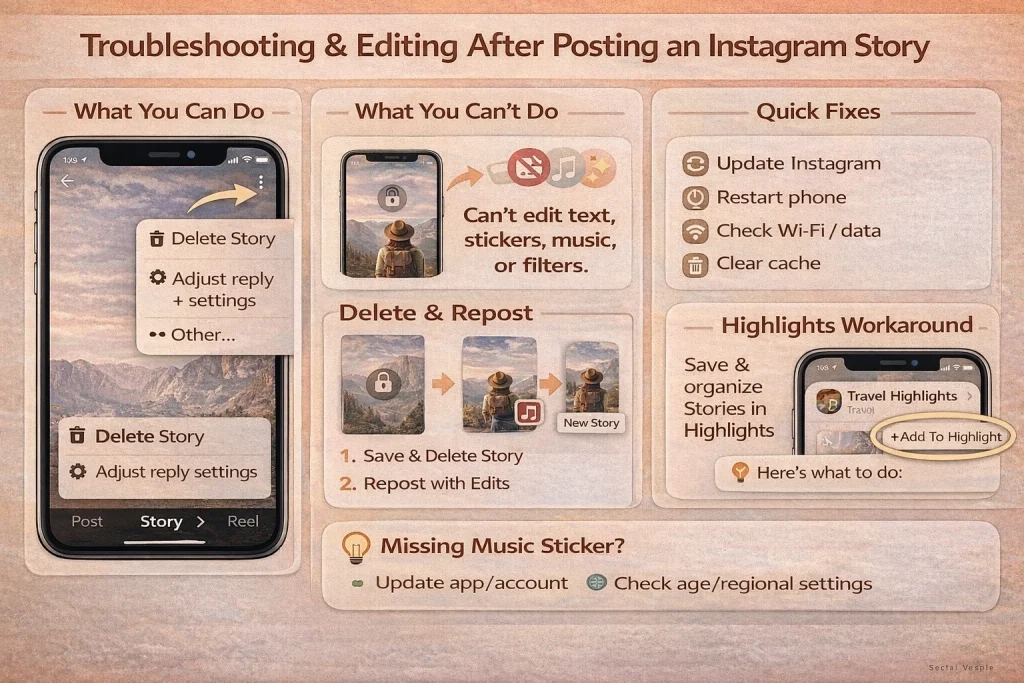
Can You Edit an Instagram Story After Posting?
The short answer is not really. Once a Story is posted, Instagram doesn’t let you edit the actual content—things like text, stickers, music, or filters are locked in. If you notice a mistake after posting, the usual fix is to delete the Story and upload a corrected version.
If you decide to remove a Story and publish an updated version, it can also help to understand how to repost an Instagram Story when sharing corrected content or reposting media.
What about trimming or splitting videos?
If your video is longer than the length allowed for a single Story frame, Instagram may automatically split it into multiple segments. This makes it easier to post longer clips, but it’s not the same as precise editing.
In many cases, the Story editor doesn’t offer detailed trimming tools, and some devices or app versions may not show trimming options at all.
If you need to make exact cuts—like removing a pause, tightening a clip, or lining up a specific moment—it’s usually better to trim the video before uploading it using your phone’s built-in photo or gallery editor or another video editing app.
For example, if you have a 28-second video but only want the most important 12 seconds, trimming it first and uploading the final version will usually give you cleaner results.
Adjusting filters and effects
Filters, visual effects, and AR effects can be changed freely while you’re still preparing your Story. You can swipe through different styles, try new looks, or remove an effect entirely before posting.
Once the Story is live, though, those visual effects can’t be changed. If you decide you don’t like how it looks afterward, the only option is to remove the Story and post a new version.
Keeping your Story looking clear and sharp
A few simple habits can help your Story look better overall:
-
Use good lighting whenever possible—this often matters more than filters.
-
Avoid screen-recording and reposting content, which can reduce quality.
-
Upload using a stable internet connection to prevent extra compression.
-
Try not to repeatedly export and re-upload the same video, since each export can lower the quality slightly.
If you edited the video in another app first, it’s also worth checking that the audio still lines up correctly before adding music or voiceovers inside Instagram.
Troubleshooting Missing Instagram Story Features
When features like music, links, or effects disappear
Sometimes features such as the Music sticker, Link sticker, effects, or drafts seem to vanish. In most cases, this doesn’t mean they’re permanently gone.
Availability can change depending on things like:
-
Region or licensing restrictions
-
Account type or account settings
-
Age restrictions
-
Gradual feature rollouts
-
Temporary bugs or app updates
Instagram also tests features regularly, so two people using the same app version may still see slightly different tools.
If something suddenly disappears, try these quick fixes:
-
Update Instagram to the latest version
-
Close and reopen the app
-
Log out and log back in
-
Restart your phone
-
Check your internet connection
-
Clear the app cache (on Android)
-
Test the feature on another account or device if possible
If the problem continues for a day or two, you can report it through Instagram’s “Report a problem” option in the app.
Using Highlights as a workaround
If you want a Story to stay visible longer than the normal 24 hours, you can add it to a Highlight on your profile. Highlights let you organize Stories into categories and keep them available for people to view anytime.
If you want more control over which Highlights appear on your profile, you can also learn how to manage or hide Instagram Highlights depending on your privacy preferences.
Privacy and Visibility Settings
Public vs. private accounts: how Story visibility works
Before you post a Story, it’s a good idea to double-check who will actually be able to see it. If your account is public, your Stories can potentially reach a much wider audience, depending on your sharing settings. With a private account, only people you’ve approved as followers can view them, which gives you a bit more control over who sees your updates.
Using Close Friends and “Hide story from”
If you want to limit a Story to a smaller group without making your whole account private, Instagram’s Close Friends feature is a simple option. When posting, you can choose to share the Story only with the people on that list.
You can also hide your Story from specific accounts through the Story privacy settings (usually found under Settings → Privacy → Story). This lets you block certain people from seeing your Stories without unfollowing or blocking them entirely.
Managing replies, mentions, and resharing
Instagram also gives you control over how people interact with your Stories. In the Story privacy settings, you can decide who is allowed to reply or send messages in response to your Story. This can be helpful if you want to reduce spam or unwanted messages.
You can also manage resharing and mentions. Allowing others to share your Story—especially when you tag them—can help your content reach a larger audience. On the other hand, if you prefer to keep things more contained, you can disable some of these sharing options.
Finally, remember that location stickers, hashtags, and public mentions can increase visibility beyond your usual followers. They can be great for promoting events, businesses, or public content—but for more personal updates, you may want to use them more selectively.
Conclusion
Knowing how to edit an Instagram Story mostly comes down to making the right changes before you post. Use the Story editor to add text, stickers, links, music, and effects, then quickly preview your Story to catch small mistakes before it goes live.
Since Instagram doesn’t allow full edits after posting, taking a moment to review your layout, timing, and placement can save you from deleting and reposting later. With the right workflow and a quick final check, you can create Instagram Stories that look clean, intentional, and engaging every time.
Alex Morris
Alex Morris is a social media strategist and lead writer at InstaDeal. He specializes in Instagram, TikTok, and creator monetization trends, helping influencers and brands grow smarter online. With over 10 years of digital marketing experience, he simplifies complex topics into practical insights.