
Knowing how to change email on Instagram is essential if you’ve lost access to your old address or want to boost account security. Many users struggle to find the right settings, risking missed notifications or even account lockouts.
How we verified this: We referenced Instagram’s Help Center and publicly available documentation and reputable guides to explain what Instagram currently shows (and doesn’t show). Features can vary by app version and region, so if your menus look different, update the app and check Instagram’s settings/help pages.
This guide will walk you through the exact steps to update your Instagram email quickly and safely. Whether you’re using the app or browser, you’ll learn how to make the change without losing access to your account.
Quick Summary
– Explain where to find the email settings in the Instagram app
– Show how to update your email using a desktop browser
– Debunk myths about needing to log out to change email
– Clarify how Instagram verifies your new email address
– Protect your account by enabling two-factor authentication after updating email
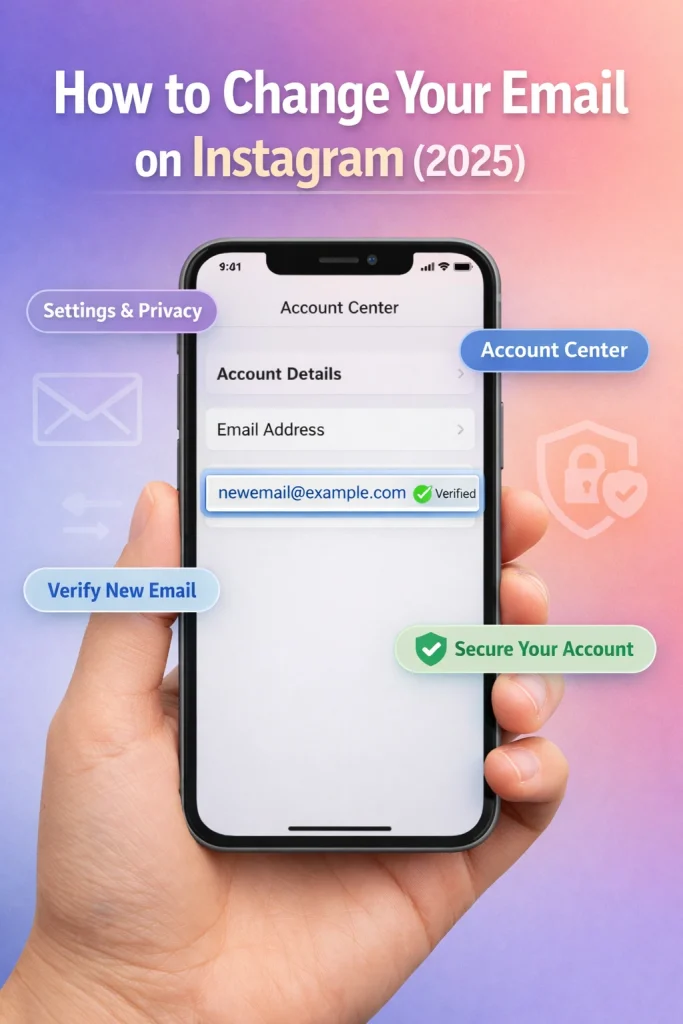
How To Change Email On Instagram (5 Simple Steps)
To change your email on Instagram, open Settings & Privacy, go to Accounts Center, update your email, and verify it via email confirmation.
1. Open the Instagram app and go to your profile by tapping your picture.
2. Tap the three-line menu in the top right and select ‘Settings and Privacy.’
3. Choose ‘Account Center,’ then select your email under ‘Account Settings.’
4. Enter the new email address and confirm your password if prompted.
5. Check your inbox and verify your new email to complete the update.
What to Know Before You Change Your Instagram Email
Updating your email on Instagram is essential for maintaining account security and ensuring you don’t miss important notifications. Your email is tied to account recovery, login verification, and communication from Instagram. Before you begin, it’s crucial to prepare and understand what this change entails.
Why updating your email is important
Your email address acts as the backbone of your Instagram account’s security. It’s where Instagram sends password reset links, login alerts, and other critical updates. If your email becomes inaccessible or compromised, you could lose access to your account entirely. For instance, if you get locked out of your account, Instagram uses your registered email to verify your identity and help you regain access.
What changes (login, recovery, alerts)
When you update your email on Instagram, the platform will send confirmation messages to both your old and new email addresses. This ensures you have control over the change and minimizes the risk of unauthorized access. Notifications, such as login attempts and account recovery links, will also be redirected to the new email immediately after the update.
Keep in mind that you’ll need access to both your old and new email addresses during this process. Instagram uses the old email to confirm the change and the new one to finalize it. If you don’t have access to either, you may face delays or additional verification steps.
How to Change Your Instagram Email on Mobile (iPhone & Android)
Changing your email address on Instagram is a straightforward process that ensures your account stays secure and up-to-date. Whether you’re using an iPhone or Android device, the steps are nearly identical, with minor interface differences. Here’s how to do it:
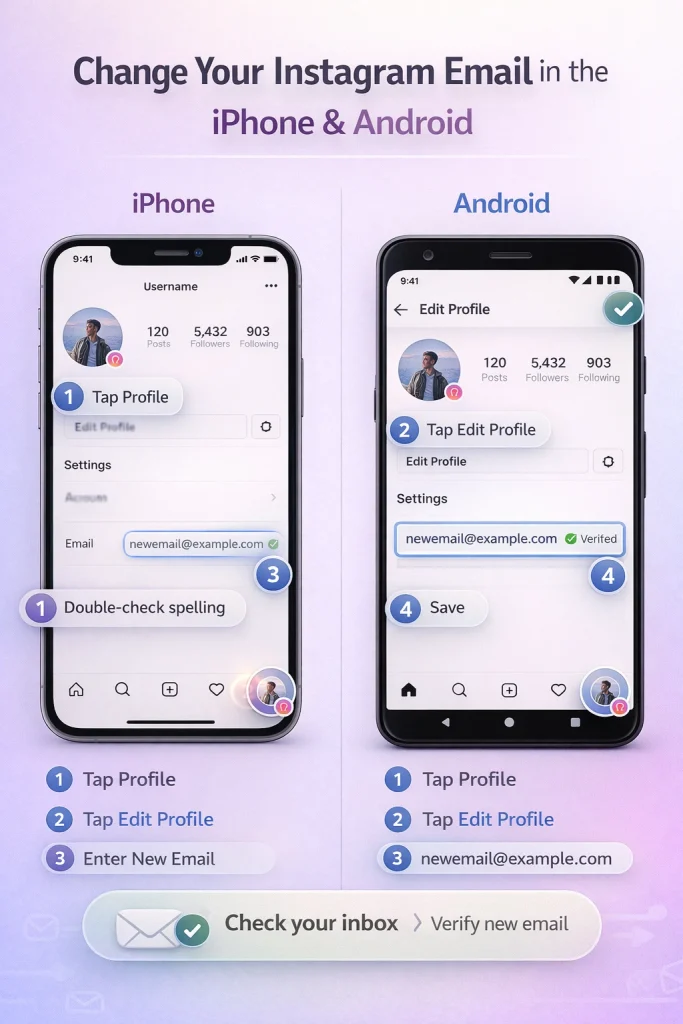
Step-by-step guide for iPhone
1. Open the Instagram app and go to your profile: Launch the Instagram app and tap on your profile icon in the bottom-right corner of the screen.
2. Tap ‘Edit Profile’: On your profile page, locate the ‘Edit Profile’ button beneath your bio and tap it.
3. Update your email address: Scroll down to the ‘Email’ field and tap it. Delete the old email address and enter your new one. Make sure you type it correctly to avoid verification issues.
4. Save changes: Tap the checkmark or ‘Done’ in the top-right corner to save your updated email.
5. Check your inbox for a verification email : Instagram will send a confirmation email to your new address. Open the email and click the verification link to finalize the change.
Step-by-step guide for Android
1. Open the Instagram app and navigate to your profile: Open the app and tap the profile icon in the bottom-right corner.
2. Select ‘Edit Profile’: On your profile page, tap the ‘Edit Profile’ button located under your username.
3. Change your email address: Find the ‘Email’ field, tap it, and replace your old email with the new one. Double-check for typos.
4. Save your changes: Tap the checkmark or ‘Done’ in the top-right corner to confirm.
5. Verify your new email: Look for an email from Instagram in your inbox and click the verification link provided.
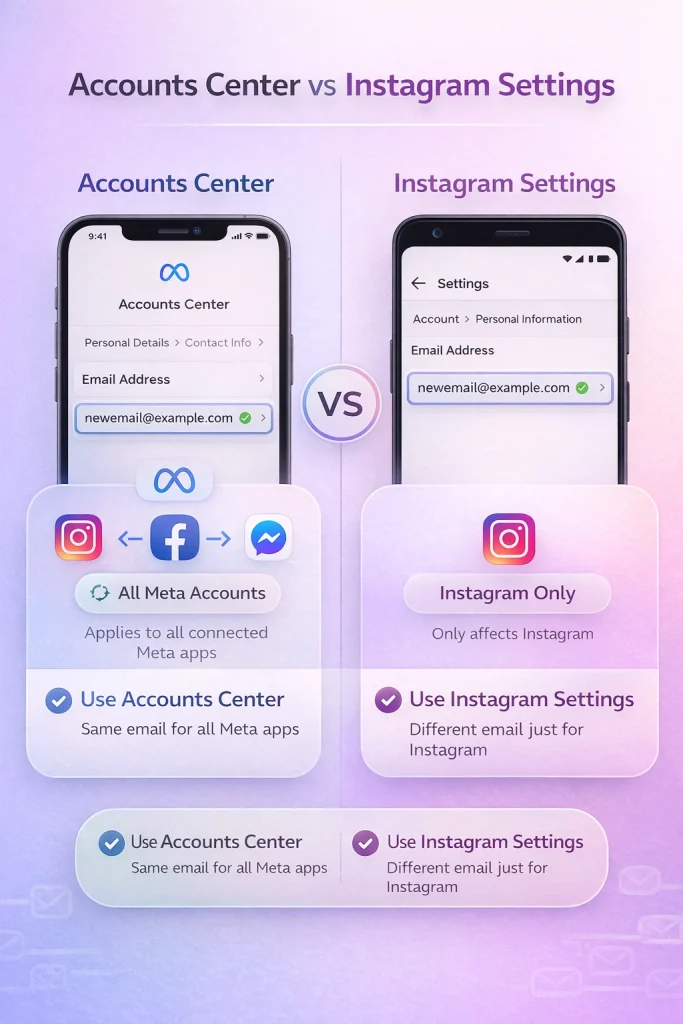
How to Change Email via Accounts Center (Meta) vs Instagram Settings
Updating your email on Instagram can be done either through the Accounts Center or directly via Instagram settings. Each method serves different needs and can simplify the process depending on your setup.
Using Accounts Center
The Accounts Center is a centralized hub where you can manage connected Meta accounts, including Instagram, Facebook, and Messenger. To update your email here, navigate to the Accounts Center via the Instagram app or any Meta platform. From there, go to Personal Details > Contact Info and edit your email address. This method is ideal if you want to ensure your email is consistent across multiple Meta platforms.
For example, if you use the same email for Instagram and Facebook, updating it in the Accounts Center automatically syncs it across both accounts. However, a common mistake is assuming that this method will update only Instagram—it applies changes across all linked Meta services.
Choosing the Right Method
If you manage multiple Meta accounts, the Accounts Center offers convenience by syncing changes across platforms. On the other hand, Instagram settings are better for isolated updates. Choose the method that aligns with your needs to avoid unnecessary changes elsewhere.
If You Can’t Access the Old Email or Phone Number
Losing access to the email or phone number linked to your Instagram account can make recovery challenging, but it’s not impossible. Instagram provides tools to help users regain control, even without old contact information.
Recovering your account without old contact info
First, use Instagram’s “Forgot Password” option on the login page. When prompted to enter your email or phone number, choose the “Need more help?” link. This redirects you to Instagram’s account recovery process. Here, you’ll be asked to provide details like your username, previous email addresses, or other account-related information. Be as accurate as possible—this helps Instagram verify your identity.
If Instagram cannot confirm your identity through the initial recovery steps, they may request proof of identity. This could include submitting a government-issued ID or a photo of yourself holding a handwritten code provided by Instagram. While this step may feel invasive, it’s a necessary measure to protect account security.
Using Instagram’s support options
If automated recovery doesn’t work, you can contact Instagram’s support team directly through the app or their Help Center. Explain your situation in detail, and include any proof of ownership, such as old account activity or linked social media profiles. Persistence often pays off here, as responses can take time.
Once you regain access, immediately update your contact information to prevent future issues. Navigate to your profile settings and add a new, secure email and phone number. This small step can save you significant trouble later.
Business/Creator Accounts: Account Email vs Public Contact Email
Your private email on Instagram is tied to account management and recovery tasks, such as password resets or security alerts. This email is not publicly visible. In contrast, your public contact info—like a business email—is displayed on your profile for customer or collaboration inquiries. Keeping both updated ensures security and professionalism.
To update your private email, navigate to Settings > Account > Personal Information. Enter your new email, confirm it, and check your inbox for a verification link. This step ensures you maintain access to your account in case of issues.
For public contact info, go to Edit Profile > Contact Options within your business or creator account. Here, you can add or update your business email, phone number, or address. These details are visible to anyone visiting your profile, so ensure they are accurate and appropriate for professional use.
Troubleshooting: Email Change Not Working
Email already in use
If you encounter an error stating that the email is already in use, it likely means the email is linked to another Instagram account. First, try logging into Instagram with that email to confirm. If it’s tied to an account you no longer use, consider deleting the old account or changing its email to free up the address. Alternatively, use a different email address that you can access and verify.
Changes not saving
When your email update isn’t saving, the issue could be related to your app or device. Start by clearing the Instagram app cache, which removes temporary files that might be causing glitches. On Android, go to Settings > Apps > Instagram > Storage > Clear Cache. On iOS, uninstall and reinstall the app to achieve the same effect.
Also, ensure your app is updated to the latest version. Outdated versions often have bugs that prevent changes from being saved. If the problem persists, switch to the Instagram web version to update your email instead.
Other common errors
Errors like “Invalid email” often stem from formatting issues. Instagram requires a valid email structure (e.g., “[email protected]”). Avoid using special characters or spaces. Another potential cause is a weak internet connection; ensure you’re connected to a stable network before attempting changes.
Changing Email Addresses During Instagram Account Transfers
When transferring ownership of an Instagram account, updating the associated email is a critical step to ensure the new owner has full control and recovery access. This process involves more than just editing profile details—it also includes verifying the new contact information and confirming that login credentials are secure. Platforms like InstaDeal, a marketplace for purchasing high quality Instagram accounts, often highlight the importance of completing these transitions carefully to prevent future disputes or access issues. Properly handling the email change during a transfer helps establish clear ownership and reduces the risk of account recovery complications later on.
FAQ
Instagram says it sent a code to my email, but nothing arrives. What do I do?
Try Resend, then check Spam/Promotions, search your inbox for “Instagram” and [email protected], and ensure your mailbox isn’t blocking Instagram. If it still doesn’t arrive, switch recovery method (SMS / WhatsApp / authenticator) or start the official recovery flow (“Need more help?” / “I can’t access this email”) in-app.
I changed my email, but Instagram still sends verification codes to the OLD email—why?
This happens to some users after changing email via Accounts Center: certain security actions (like password change) may still reference the old contact route for a while or be stuck. Best workaround: ensure the new email is fully verified, then re-check Accounts Center contact info; if it persists, use Instagram’s recovery/help pathways. (This issue is widely reported and often unresolved in the short term as Instagram may take sometime to trust new email)
I can’t access my old email or phone number. Is my account gone?”
Not necessarily. Use the Lost access recovery flow. Instagram may offer alternate verification (e.g., identity checks). If you’re prompted with options like “I can’t access this email or phone number,” follow that route.
My email change won’t save / keeps reverting. Any fix?
Try doing the change on instagram.com (desktop web) if the app is glitchy. Some users report the web update “sticks” when the app doesn’t. Also update the app and retry.
Instagram says I can’t change certain settings for a few days—what does that mean?
This usually appears after Instagram detects a new device/login or suspicious activity. You may be temporarily restricted from changing sensitive settings (like email/password) except from previously trusted devices—wait it out and try again from the device you used before.
Someone hacked me and changed my email. What’s the fastest action?
If you get an Instagram email about an email/password change you didn’t request, use the “secure my account” / deny change option in that email immediately. If you’re locked out, use instagram.com/hacked and follow recovery prompts.
Conclusion: How To Change Email On Instagram
Changing your email on Instagram is a simple but essential step to keep your account secure and recoverable. Whether you’re updating contact info, fixing login issues, or switching platforms, following the right process helps prevent missed notifications or lockouts. Just don’t forget to verify your new email and review your security settings afterward to keep everything protected.

Benjamin Amiri
Benjamin Amiri is a digital growth consultant and senior contributor at InstaDeal. He specializes in Instagram engagement strategies, Facebook ads innovation, and TikTok product marketing. With a track record of scaling brands and creator accounts, Benjamin turns performance data into actionable growth tactics that deliver measurable results.