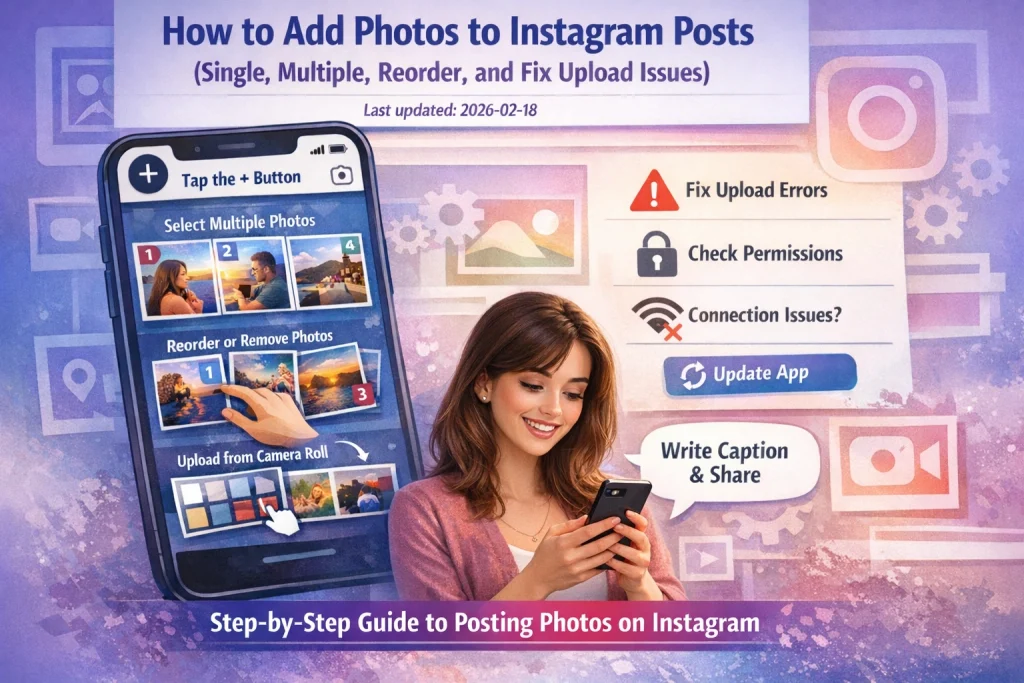

If Instagram won’t let you pick the photos you want—or your carousel won’t upload—you’re usually dealing with one of three things: the wrong posting screen, missing permissions, or a file that Instagram doesn’t like.
In this guide, you’ll learn exactly how to add photos to Instagram posts step by step, including how to select multiple photos, add more images before publishing, and handle common issues that stop photos from being added.
How to Add a Photo to a New Instagram Post (Mobile & Desktop)
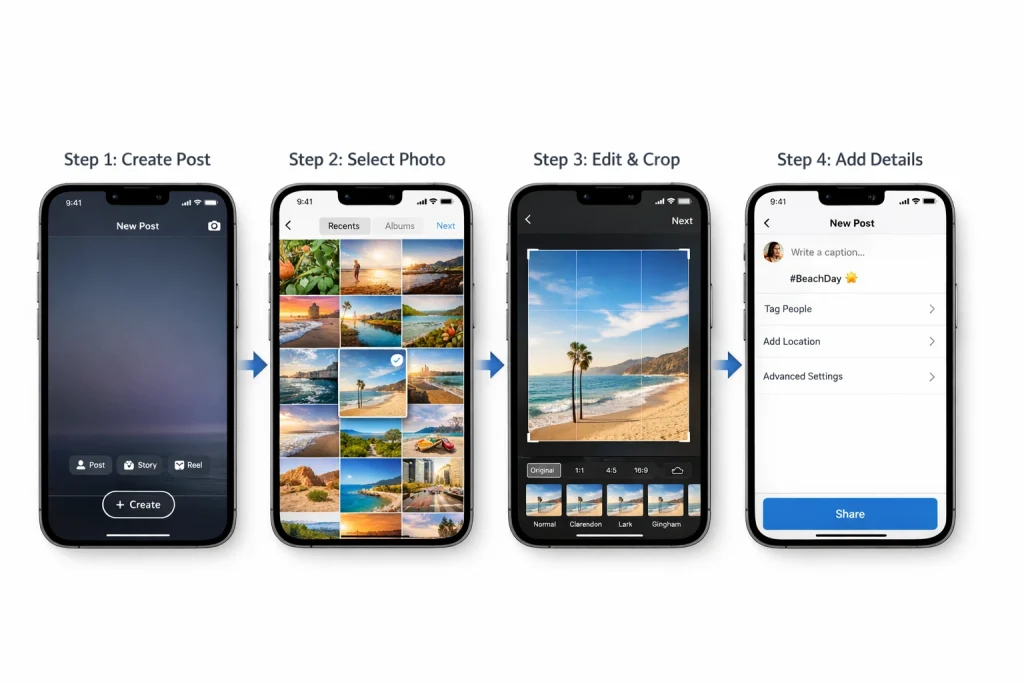
Post a Single Photo (iPhone & Android)
-
Open Instagram.
-
Tap the ➕ Create icon (top right or bottom center based on your layout).
Some updates also let you long-press the Instagram icon for “New Post.” -
Choose Post.
-
Select one photo from your camera roll or take a new shot.
-
Tap Next.
-
Apply edits (filters, crop, adjustments) if needed.
-
Tap Next again.
-
Add your caption, tags, location, and optional settings.
-
Tap Share — your photo goes live.
This is the simplest flow for a single photo post. If you don’t see a photo grid, Instagram may be on an older layout — update the app and restart it.
Post a Single Photo (Desktop)
-
Go to instagram.com in your browser.
-
Tap Create in the top right.
-
Select your photo from your computer.
-
Choose an aspect ratio or crop.
-
Add caption, tags, and location.
-
Click Share.
Post Multiple Photos (Carousel)
Instagram now supports up to 20 photos and videos in one carousel post for many users — this expanded limit is rolling out globally though some accounts may still see 10. If you want a deeper breakdown of selection order, layout behavior, and common mistakes, see this step-by-step guide to posting multiple photos.
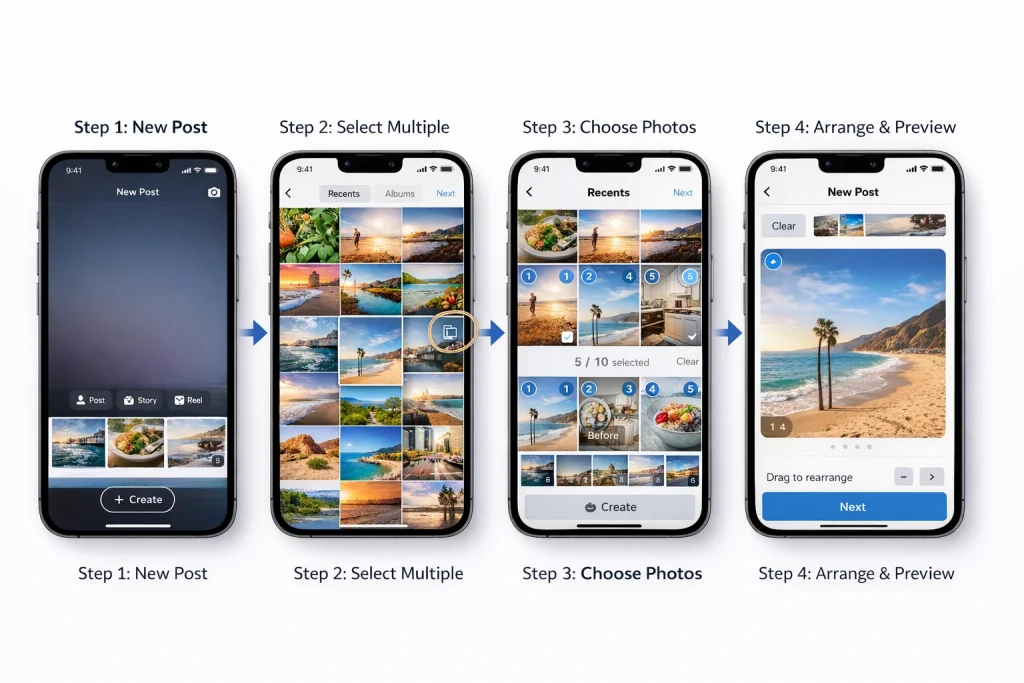
Steps
-
Tap the ➕ Create icon → Post.
-
Tap Select multiple (stacked-squares icon).
-
Choose up to 20 items (photos/videos). Each selected slide gets a number.
-
Tap Next.
-
Optionally edit slides, then Next again.
-
Add caption, tags, location, then Share.
If you see only 10 items, update the app and check again — the expanded limit is still rolling out.
Notes on Uploading & Formats
Instagram supports the standard feed aspect ratios: square (1:1), portrait (4:5), and landscape (1.91:1). When selecting a photo, you can tap the aspect ratio control to adjust how the image fits within the frame before publishing. Portrait images generally take up more vertical space in the feed, which can make them more visually prominent while users scroll.
If you are creating a carousel with multiple photos of different sizes, Instagram may allow mixed aspect ratios within the same post depending on the version of the app. When available, this setting preserves each image’s original orientation instead of forcing every slide into one crop style.
How to Reorder or Remove Photos Before Posting
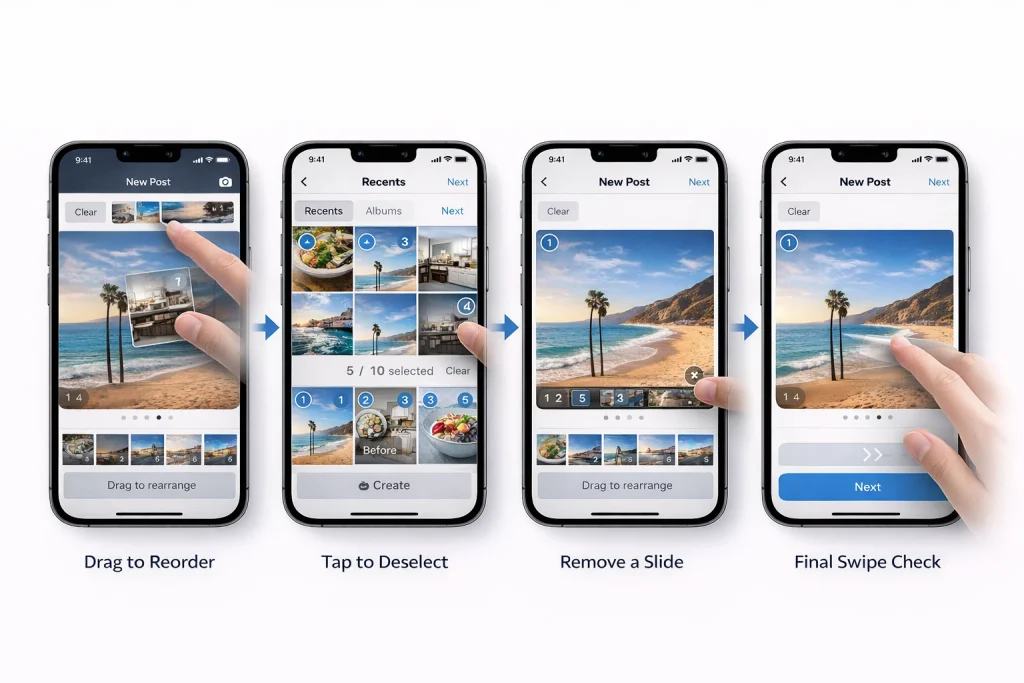
How to Reorder Carousel Photos
After selecting multiple photos for a carousel, Instagram assigns a small number to each thumbnail. That number shows the publishing order.
To change the order, press and hold a selected thumbnail, then drag it left or right. Release it in the correct position. The numbers update automatically.
If drag-to-reorder isn’t available on your app version, go back to the selection grid. Deselect the slides, then reselect them in the exact order you want. Instagram publishes them in the order you tap them.
How to Remove a Photo Before Posting
If you want to remove one image from the carousel, tap the selected thumbnail again to deselect it. On some versions, a small remove icon appears on the thumbnail — you can use that instead.
Important: deleting a photo from your camera roll does not remove it from the current Instagram selection. You must remove it inside the Instagram post screen.
Quick Check Before Sharing
Before tapping Share, swipe through the preview once. Make sure:
-
The strongest image is first.
-
The order makes sense.
-
No slide is cropped awkwardly.
Most “wrong photo first” mistakes happen because the order wasn’t double-checked.
What You Can and Can’t Change After Posting (Updated 2026)
After a post goes live on Instagram, you have some editing flexibility, but the platform also has clear limitations on what can be changed once the publish button is tapped. This affects both single images and carousel posts.
What You Can Edit After Posting
Once your Instagram photo post or carousel is published, you can adjust several metadata components without deleting the post:
Caption & Hashtags — You can fix typos, rearrange text, or add emojis and hashtags by tapping the three dots (⋯) on the post and selecting Edit.
Tagged People — You can add or remove user tags on photos and carousel slides after posting.
Location — You can add or change the location metadata to improve context or discoverability.
Alt Text — Instagram lets you edit or add alternative text for accessibility from the same Edit screen.
These edits let you refine how your post is presented and discovered without removing the original content.
What You Cannot Change After Posting
-
You cannot add new photos or videos to a published post. The carousel remains fixed once posted.
-
You cannot reorder carousel slides after publishing; the sequence is locked in.
-
You cannot replace images or apply new filters/crops to already published photos.
-
You cannot change the post type (e.g., convert a single image post into a carousel).
This means the visual content — the photos and videos themselves — is fixed once shared.
Why These Limits Exist
Instagram’s platform design prioritizes the integrity and engagement history of a post. Allowing users to change photos or reorder slides after posting could alter how others have already interacted with it (likes, saves, comments). As a result, the system locks down those elements once shared.
Summary
| Editable After Posting | Not Editable After Posting |
|---|---|
| Caption | Photos/Videos |
| Hashtags | Reorder carousel |
| Tagged people | Add new photos |
| Location | Change post type |
| Alt text | Replace images |
Workarounds If You Forgot a Photo After Posting (Updated Info)
The “Delete and Repost” Method
If the missing photo is critical — for example, it contains key product information or legal text — the only direct way to include it in the original set is to delete the post and upload a corrected version with all slides together.
This approach resets likes, comments, and post engagement history, so it’s best used when the mistake is severe and early enough that reposting won’t harm your reach too much.
Use the “Recently Deleted” Folder to Reorder (Advanced, Risky)
There is a more advanced workaround for reordering existing slides or reshuffling a carousel without fully deleting the entire post. It involves:
-
Editing the post and deleting the slide(s) you want to move.
-
Saving the post so those media are removed.
-
Opening Settings → Your Activity → Recently Deleted.
-
Restoring the deleted photos from there.
When restored, Instagram places them at the end of the sequence, effectively changing the order.
Publish a Separate Follow-Up Post
Instead of touching the original post, another clean solution is to publish a second carousel or single photo post with the missing images or moments, then link back to the original in the caption or a pinned comment. This maintains the integrity and engagement of the original post while still delivering the omitted content to your audience.
Use Stories or Highlights
If you just want visibility for the missing photo without disrupting the post flow, share the images to your Story. Use context like “missing shot #3 → see post below!” to connect it back to the original content. Save the Story to a Highlight named “Updates” or similar so it stays accessible after 24 hours.
Recommended Photo Sizes, Formats & Upload Tips (Updated 2026 Standards)
Instagram now supports a wider range of photo sizes and aspect ratios than it did in the early years, but the platform still has optimal dimensions that help your posts look crisp and load properly without excessive compression. These recommendations are based on Instagram’s current behavior and confirmed image-size guides for 2026.
Best Instagram Feed Post Sizes (Still Current in 2026)
Instagram feed photos should be uploaded at 1080 pixels wide — the platform will usually resize larger files down to this width and smaller images up, which can reduce quality.
-
Vertical (Portrait): 1080 × 1350 px (4:5) — this ratio fills the most vertical space on phones and is generally the best choice for engagement.
-
Tall/3:4 Option: 1080 × 1440 px — Instagram now supports 3:4 posts that display more of your original image with less cropping.
-
Square: 1080 × 1080 px — universally compatible but takes up less screen space than a vertical post.
-
Landscape (Horizontal): 1080 × 566 px (approx. 1.91:1) — valid and supported but smaller in the feed and less engaging unless the image truly needs it.
Image Formats & Compression
Instagram supports the following photo formats:
-
JPG / JPEG: Best for standard photographs — uses efficient compression.
-
PNG: Ideal when your image contains text, graphics, or transparency.
Avoid sending photos much larger than Instagram’s recommended sizes. Large images often get auto-compressed by the app, which can introduce unwanted artifacts.
Summary Table — 2026 Optimal Sizes
| Use case | Aspect Ratio | Recommended Size |
|---|---|---|
| Portrait feed posts | 4:5 | 1080 × 1350 px |
| Tall feed posts | 3:4 | 1080 × 1440 px |
| Square feed posts | 1:1 | 1080 × 1080 px |
| Landscape feed posts | 1.91:1 | 1080 × 566 px |
| Profile photo | 1:1 | 320 × 320 px minimum |
Conclusion: How to Add Photos to Instagram Posts
Adding photos to Instagram is simple once you’re on the correct screen: use Create → Post for a single image, or tap Select multiple to build a carousel. Confirm the order before sharing, since you can’t change the photos or their sequence after publishing.
If something goes wrong, check permissions, update the app, or re-export the image. And if you forget a photo, your only real fixes are reposting or sharing it separately.
Get the setup right before you hit Share — that saves the most time later.
FAQs people keep asking
Why can’t I select multiple photos (the stacked-squares icon is missing)?
You’re usually on the wrong surface (Story/Reel instead of Post), or Instagram is in an A/B layout where the button moves. Switch to Create → Post, update the app, and try again.
Why does Instagram turn my carousel into one collage / one slide?
That’s typically a Story workflow or a different creation mode (some apps/platforms combine selections). Make sure you’re creating a feed Post (not Story), then use Select multiple for a carousel.
Why can I only add 10 photos? Didn’t Instagram increase the limit?
Many users now see a higher limit, but not everyone has it yet (rollouts vary by account/app version). If you’re capped at 10, update the app and try again later—it’s not always a settings issue.
Did Instagram remove mixed aspect ratios in one carousel?
Some users report they could mix ratios before, then lost it later—this appears to change by app version/rollout. If your account doesn’t show mixed ratios anymore, you may need to standardize all images to one ratio before uploading.
Why do my photos look worse / more compressed after posting?
Instagram compresses uploads; heavy edits + large files can look worse after processing. Export close to recommended dimensions and avoid multiple re-saves before upload (each save can add artifacts).

Alex Morris
Alex Morris is a social media strategist and lead writer at InstaDeal. He specializes in Instagram, TikTok, and creator monetization trends, helping influencers and brands grow smarter online. With over 10 years of digital marketing experience, he simplifies complex topics into practical insights.